Category Archives: Uncategorized

Viruses et al : Natures own AI bots!

Yes,

I stumbled upon this understanding a while back!

Lets look at AI bots first:

  1. They have all logic programmed in them for a particular situation.
  2. They have stimulus response, partially developed.
  3. They need to be activated somehow (OK Google, Hey Siri, Hey Cortana, Yo! Alexa etc)
  4. They partially replicate human senses.
  5. Can wreck hovac!

Now lets see viruses in comparison:

  1. They have all the mechanism in place for replicating and doing their unique thing.
  2. Some are capable of stimulus response
  3. They need a living host body to grow, develop, survive , activate , replicate, spread.
  4. Most of them replicate cell functions that harm the body.
  5. They have caused lot of destruction!

Nature via evolution, creates these complex particles(A virus, that has not yet contacted the host body is called virion, which is made up of nucleic acid(RNA or DNA) and/or an outer shell of protein.).

Once created/come into existence, they need a host system to act, and that happens to be a living cell in a living body.

So the virus cannot operate without cell, similarly the AI bots cannot operate if they run out of battery(cell’s), You see?!

There you go, we are entering a world of human created viruses, as if nature’s contribution was not enough already!!

PS: The word android means : A robot/automaton with a human appearance!


Rant : Covid-19 vs Me(The software developer)

Long time, no See folks!

Writing after a long time, a discussion with @SoftwareGod, triggered this blog post!

(I am in self induced inertia!)

So the discussion was about we(s/w devs) contributing to the drug discovery hackathon for Covid-19.

Why I choose not to join:

1/Hackathon is open sourced, everything else is IPR‘ed.

2/No “Getting started with biological virus” guide I could find?

3/What are our R&D scientists doing in virus labs?

4/IMO, get a super computer in place for running simulations, although the mobiles and laptops are a lot powerful today, I am sure super computers run on petaBytes/milliseconds speeds!

So, that done, I recalled, hey! I had once developed an anti-virus programme, in Visual Basic(I had super-less love for M$ at that time).

Going back in that time….

I was forced to learn VB, and I was making faces inside of me, like why??

Coincidentally during that time, my system was hit by HTML RedLof.A virus, it was the era of floppy exchanges, usb drives were not so common.

So, this novel idea sprung up in me, why not cure poison with poison (Hu Ha Ha Ha…. Hu Ha Ha Ha….) 😀

So my next task was writing a cure for the virus(not vaccine) in my least liked languages M$ VB.

Looking back, this was the algo, which may/maynot be mapped to biological virus.

1/The first thing, I noticed in my system was , the free hard disc space started reducing.

{identify unique or distinguishing symptoms}

2/I could not understand the reason first why. but on closer analysis, I saw my recently modified files being htm,html where the size increased by a fixed amount.

{check inflammatory markers, or the first response body gives when attacked by virus}

3/On opening those files, at the end of the source code, I saw alien code of the virus and its replication.

{Once infected area found, extract and analyze; this is very domain specific}

4/The virus was replicating and affecting html,htm files, other infected extensions were: jsp and vbs.

{understand how virus entered the system, stop that first}

So most probably an infected html or vbs file kept in an already-infected floppy, affected my system.

5/Now that the pattern was identified, I simply wrote VB program, to

a)Scan whole computer for defined extensions files

{in covid-19: various proteins}

b)For each such file, reg-ex the starting of the alien code and end

{find a way to delink the alien protein}

c)Delete that piece of the code

{Kill Kill Kill}

d)Save the file.

{replenish that part, shower with newer safe proteins}

I confirmed the same via anti-virus programmes as:

1/Ran the 3rd party anti-virus : Infection NOT found

2/Infected my system with the virus

3/Ran the 3rd party anti-virus : Infection found

4/Executed my VB program

5/Ran the 3rd party anti-virus : Infection NOT found

This ways my system got rid of the virus completely.

Coming back to biological viruses, I think we can take help from Symantec,F-Secure and such “anti-virus” software making companies, because they have studied so much more patterns of viruses, and that can be employed to faster Drug Discovery!

Thanks for reading! 🙂
Things everyone should know about responsive images and srcset

The aim of responsive images is to deliver the same image in mobile and desktop view without disturbing the viewport size that is the image should look alike in every device .

Therefore this problem of responsive images can be solved by using srcset attribute in image tag or using media queries.

Both are suitable to deal with this situation but prefer to use srcset instead of media queries because media queries will take time to write but srcset does the same thing in small time and space .
The information below will explain all about srcset .

srcset
The srcset attribute is listing different resolutions of the same image from which the browser chooses the best fitting image source before loading it.
Example: srcset="ninja-1000w.jpg 1000w, ninja-500w.jpg 500w, ..."
To calculate this, the browser assumes the image fills up the full viewport width (100vw) by default, which means it uses the full width of the browser.

In short, Srcset is a new attribute which allows you to specify different kind of images for different screen-sizes/orientation/display-types.
The usage is really simple, you just provide a lot of different images separating them with a comma like this:

<img src="image.jpg" alt="image" srcset="<img> <descriptor>, ..., <img_n> <descriptor_n>">.

Here is an example:

srcset="image.jpg 160w, image2.jpg 320w, image3.jpg 2x"

Descriptors are just a way to show what kind of image is coming from the resource. There are various kinds of descriptors:

  1. density descriptor–> srcset=”image.jpg, image-2X.jpg 2x” The display density values—the 1x, 2x, etc. are referred to as display density descriptors. If a display density descriptor isn’t provided, it is assumed to be 1x.
  2. width descriptor –> srcset=”image-240.jpg 240w, image-640.jpg 640w”.
    When using the w-descriptor we have to specify the default explicitly by adding a second srcset image option, with its own w-descriptor, and separating them with a comma.
  3. size descriptor–> It only makes sense if you use width descriptor.
    srcset=”image-160.jpg 160w, image-320.jpg 320w, image-640.jpg 640w, image-1280.jpg 1280w” sizes=”(max-width: 480px) 100vw, (max-width: 900px) 33vw, 254px”>.
    The instructions for the browser would look like this: (max-width: 480px) 100vw — if the viewport is 480 pixels wide or smaller, the image will be 100% of the viewport width.So it is like using media queries in html which looks a lot easier as compared to media queries written in css .

Pros–>
1.much easier than media query
2.saves time

Cons–>
1.Browser should be updated to see the effect
2.Not all browsers support this.
At present, Edge, Safari, and iOS Safari only support a subset of the srcset specification. Firefox, Chrome, Opera, Android Browser, and the forthcoming versions of Safari and iOS Safari fully support it.

Demo can be seen on my github link

pershantgoel.github.io/imgsrcset

Test Driven Development with SpringBoot+Junit


Test-driven development(TDD) in the Spring framework.

TDD  helps me speed up my software release cycles, and ensure that I end up with a high-quality product. Spring makes Java enterprise development much easy.  Spring Boot, which we will use in this blog, is a project that does this task with excellence.

Follows are the steps to configure your spring boot framework with the Junit and Maven.

Step-1)Set up Spring boot with J-Unit testing Approach

After Set your maven dependencies , for spring-boot add following dependency for testing Approach.

<dependency>
<groupId>junit</groupId>
<artifactId>junit</artifactId>
<version>4.4</version>
<scope>test</scope>
</dependency>

<dependency>
<groupId>org.springframework.restdocs</groupId>
<artifactId>spring-restdocs-mockmvc</artifactId>
<scope>test</scope>
</dependency>

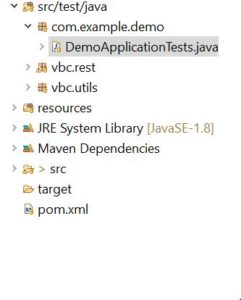
Step-2)Create test Package and in that ,create DemoApplicationTests Class.

Step-3)Inject controller using @InjectMocks, Inject repository using @Mock Annotations.

Let us take some J-Unit Annotations used in java class :

@Before:@Before annotation are executed before each test.

@After:It executes after each test.

@BeforeClass: It executes common operation before each test,So it executes  only once before running all tests.

@AfterClass: It executes common operation after each test, So it executes only once after running all tests.

@Test:The Test annotation tells JUnit that the public void method to which it is attached can be run as a test case.

In JUnit 5, the tags @BeforeEach and @BeforeAll are the equivalents of @Before and @BeforeClass in JUnit 4.

Configure Java File and Select Run as Junit and Test the file.


Congratulations!!!you are done with your TDD approach.

Eclipse not auto-configuring/auto-importing a Git mavenized project

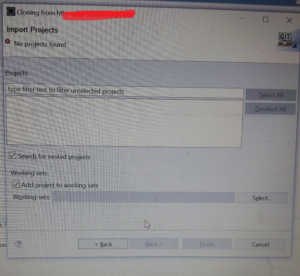
I was trying to setup a maven project in eclipse via GIT. I had hoped, it will auto import the project into eclipse, but for some reason that did not happen.


This is what was done as a workaround:

Step:1 Checkout your repository in your system

File->import->Git->Project from Git->Clone URI->Enter Git Repository Details

Select Destination where you wanted to store your Git Repository

Step:2 Import your Project into Eclipse

File->import->maven->install or deploy an artifact to a Maven Repository

Once these steps are done, The project is browsable in eclipse!

Some Helpful Git Commands for the commandline:

git init — Initialize your directory with git.

git add FILE and git checkout — FILE To stage/unstage a file

git commit— To save your changes. This commit will be local

git stash and git stash pop — Stashes are back

git reset HEAD –hard Revert all your local changes

git log— Access all the history in the repository

git rebase –You can squash all the commits! (one should be carefull with this one)

git branch –You can create local branches,But keep the history linear

Hope this workaround and the commands are useful to a new user.

New Active members!

In the coming few weeks you might be seeing lots of activity on the blog!

Credit to : Margi(margi_train) and Pershant(pershant_foodie)!

(Please give them a warm welcome!)

Look forward to their contributions on various technology topics!

Talking to mysql on Bitnami google-cloud Tomcat instance

The Java deployment world is plagued with infra issues! Things we need to take care of:

  • Apache
  • Tomcat
  • RDBMS
  • Firewall/Ports
  • Shell accesses
  • Security/Encryption/Keys
  • File System Storage
  • Indexes corrupting and the list goes on…

So after my failed attempt to understand/decipher CORS issues on the AWS platform, I fortunately stumbled on google-cloud! And it is one hell of a bouquet of services for us petty and dev-ops-complaining Java folks!

So churn out a bitnami tomcat instance and you get the feel of the aws thing. For over a month now my google cloud app was(still is) talking to the mysql instance on aws, before that starts to drain my mini wallet, time to configure a mysql instance on google-cloud. And here are the steps:

  1. Have access to the SSH into your google cloud instance working
  2. Create following script (/home/bitnami/mysql-init):
  3.  UPDATE mysql.user SET Password=PASSWORD('NEW_PASSWORD') WHERE User='root';
     FLUSH PRIVILEGES;
    
  4. sudo /opt/bitnami/ctlscript.sh stop mysql
    
  5. sudo /opt/bitnami/mysql/bin/mysqld_safe --defaults-file=/opt/bitnami/mysql/my.cnf --pid-file=/opt/bitnami/mysql/data/mysqld.pid --init-file=/home/bitnami/mysql-init 2> /dev/null &
    
  6. sudo /opt/bitnami/ctlscript.sh restart mysql
  7. Remove the script in step 2.

So it turns out to get mysql talking on your bitnami instance you only need to reset the password.

Further to enable remote access do this in

/opt/bitnami/mysql/my.cnf:

  •  #bind-address=127.0.0.1
    

Next to enable remote mysql access via workbench you need to enable firewall ports to allow connections for tcp 3306 for a specific ip on your google cloud instance.

And there you go, you have a lot powerful config, much like aws ready to be used, backed by google!!


android:

Gang! Welcome to the world of Mobility ~ here also we’ve something great called ‘JAVA’ so let’s get started with basics of Android platform for cell phones…….! So :P, First thing to be ask for ? What is Android ?

Android is a software stack for mobile devices….. that includes an operating system, middleware and key applications. The Android SDK provides the tools and APIs necessary to begin developing applications on the Android platform using the Java programming language.

FYI: We’ll have posts on Android SDK and ENV. setup later…!

And now what is the …..? Android Application Fundamentals :

Android applications are written in the Java programming language. The Android SDK tools compile the code—along with any data and resource files—into an Android package, an archive file with an .apk suffix. All the code in a single .apk file is considered to be one application and is the file that Android-powered devices use to install the application.

Once installed on a device, each Android application lives in its own security sandbox:

  • The Android operating system is a multi-user Linux system in which each application is a different user.
  • By default, the system assigns each application a unique Linux user ID (the ID is used only by the system and is unknown to the application). The system sets permissions for all the files in an application so that only the user ID assigned to that application can access them.
  • Each process has its own virtual machine (VM), so an application’s code runs in isolation from other applications.
  • By default, every application runs in its own Linux process. Android starts the process when any of the application’s components need to be executed, then shuts down the process when it’s no longer needed or when the system must recover memory for other applications.

IoC vs. DI

How do you exactly define IoC (Inversion of Control) vis a vis DI (Dependency Injection)?

Well, as my first attempt at defining IoC and DI, I made the following statement.

IoC is the concept and DI is the way of implementing that. Pretty neat, huh? But how do I go explaining this to anybody in greater depth?

Now, it seems I do have an answer, according to the book Spring In Action:

“IoC aims to offer a simpler mechanism for provisioning component dependencies (often referred to as an object’s collaborators) and managing these dependencies throughout their lifecycles.”

It further states that “IoC can be decomposed into two subtypes: Dependency Injection and Dependency Lookup.”

Now drilling down further, DL (Dependency Lookup) allows acquisition of a reference to a dependency, whereas in DI, the IoC container itself is injecting or providing those dependencies. One can draw an inference that the former scenario is allowing you to control how and when to acquire the dependency and in the second case the container is having the control over the dependency lifecycle.

So, the statement I made above is validated upto a certain extent.

Any further thoughts/comments on this would be certainly welcome.